- A+
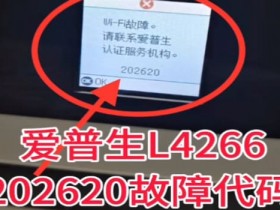
Epson Resetter software is a tool that helps to reset the waste ink pad counter on Epson printers, which will eliminate the “Service Required” error message and allow the printer to continue working. Here’s a step-by-step guide on how to use Epson Resetter software:
Step 1: Download Epson Resetter software from a trusted website, and unzip the file to your computer.
Step 2: Turn off the printer and disconnect it from the computer.
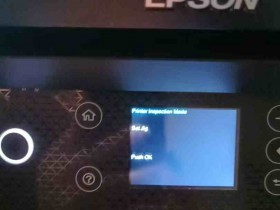
Step 3: Open the Epson resetter software you’ve downloaded, and select the printer model you want to reset.
Step 4: Click the “Particular Adjustment Mode” button on the software interface.
Step 5: Choose the “Waste Ink Pad Counter” option in the Maintenance section, and click the “OK” button.
Step 6: Check the “Waste Ink Pad Counter” option again, select “Main Pad Counter,” and click the “Check” button.
Step 7: Click the “Initialization” button to reset the Waste Ink Pad Counter.
Step 8: Turn off the printer and restart the computer.
Step 9: Connect the printer to the computer, turn it on, and run a nozzle check to ensure that it is working correctly.
In conclusion, this process of using Epson Resetter software to reset the waste ink pad counter is easy to follow, and it’s a cost-effective solution for those who want to prolong the life of their printer. However, please be cautious when downloading Epson Resetter software from any website, as some files may contain viruses or malware that can damage your computer. Always download from a trusted website, and follow the above steps carefully to ensure success with the reset process.
- 在线微信客服
- 加13296583115 故障咨询
-

- 远程QQ客服
- 加QQ113868949远程服务
-